
Article: Why Do Candles Tunnel Unevenly? Causes and Fixes
Why Do Candles Tunnel Unevenly? Causes and Fixes
A candle can fill a room with comfort, calm, and a fragrance that feels like home, then leave behind a frustrating ring of untouched wax. If you have ever wondered, why do candles tunnel unevenly, the answer is usually not that your candle is ruined. More often, it is responding to the way it was burned, where it was placed, or the delicate balance between wax, wick, and flame.
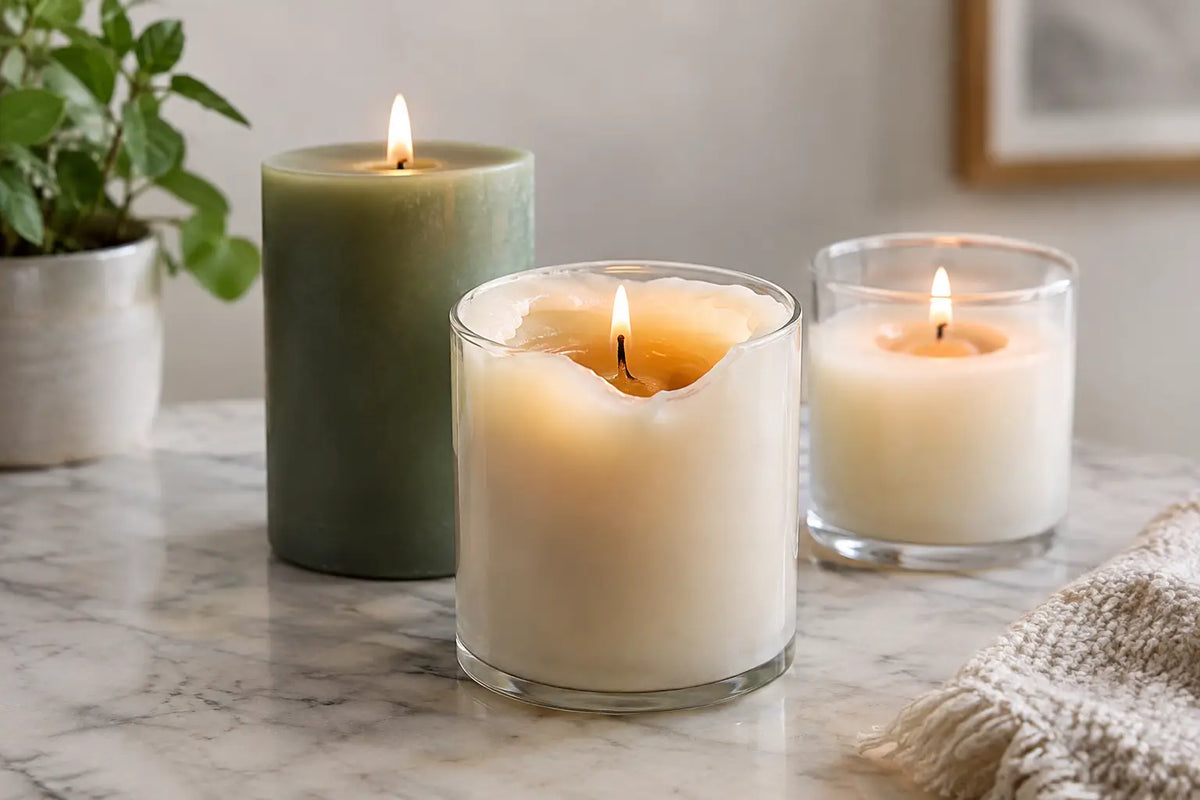
Tunneling happens when a candle burns straight down through the center instead of melting wax evenly from edge to edge. An uneven tunnel is simply a more noticeable version of the same issue: one side of the vessel is melting while the other remains high and firm. With a little care, many candles can be brought back to a beautiful, even burn.
Why Do Candles Tunnel Unevenly?
Candles are small mood-makers, but they are also tiny systems of heat and airflow. For a smooth melt pool to form, the flame needs enough time and stable conditions to warm the wax evenly. When one part of that system is off, the wax will reveal it.
The first burn was too short
The first burn sets the candle's memory. Soy wax and other container waxes tend to melt only as far across as the candle has melted before. If a large candle is extinguished after 30 minutes, when only a small circle of wax has liquefied, that smaller circle can become the path the flame follows on future burns.
This does not mean every first burn must last all day. A good rule is to let the melt pool travel close to the edges of the vessel, which may take two to four hours depending on the candle's diameter. Never burn longer than the burn-time guidance provided with your candle, and never leave a lit candle unattended. The goal is an intentional ritual, not an endless flame.
A draft is pulling the flame to one side
An uneven melt pool often begins with a flame that leans. Open windows, ceiling fans, air vents, and even frequent foot traffic can shift the flame toward one side of the jar. That side receives more heat, while the opposite side gets left behind.
You may also notice black soot on one area of the glass, a flickering flame, or a wick that appears to bend after the candle cools. These are quiet signs that the candle needs a calmer setting. Place it on a stable, heat-resistant surface away from moving air, and your fragrance ritual will feel more peaceful in every sense.
The wick needs a trim
A wick that is too long can create a tall, dancing flame. While that may look dramatic, it does not always create a better burn. An overlong wick can pull in too much fuel, produce excess heat or soot, and bend in the direction of airflow. A wick that is very short, buried, or clogged with char can also struggle to generate enough heat to melt the wax evenly.
Before each lighting, once the candle is completely cool, trim the wick to about one-quarter inch. Remove loose wick trimmings from the wax surface. This small act of care supports a steadier flame and keeps the candle looking as refined as the space it was chosen for.
The candle is not sitting level
Sometimes the answer is wonderfully simple: the candle is slightly tilted. A shelf, tray, table, or countertop that is not level can cause melted wax to collect on one side. Since liquid wax carries heat, the deeper side may continue melting faster while the shallower side stays raised.
Check the candle's surface before lighting. If it looks uneven while cool, move it to a flatter area. A level surface matters for safety, but it also helps protect the clean, balanced look of your candle as it burns.
Room temperature is working against the wax
Wax responds to its surroundings. In a cold room, the side closest to a chilly window or exterior wall may harden faster than the rest. In a very warm room, wax can melt more quickly than expected. Temperature alone does not usually cause dramatic tunneling, but it can intensify an existing issue, especially with a wide candle or a delicate first burn.
Try to burn candles in a comfortably temperate room, away from direct sunlight and cold drafts. This is particularly helpful for handcrafted soy candles, whose soft, creamy wax is designed to create a gentle ambiance rather than perform like industrial paraffin.
The wick and vessel may not be a perfect match
Every candle is a balance of vessel width, wax blend, fragrance load, wick type, and dye. A maker tests these elements to create a beautiful burn, but natural materials can still vary from batch to batch. Soy wax may also develop frosting, a crystal-like appearance that is cosmetic and does not harm performance.
If a candle has been cared for properly and repeatedly burns dramatically to one side, the issue may be related to wick placement or wick performance. A centered wick should be centered again after each burn while the wax is soft, using a wick dipper or another candle-safe tool. Do not touch hot wax or move a burning candle.
How to Fix an Uneven Candle Tunnel
A shallow tunnel is often easy to correct. Start with the gentlest approach: give the candle a longer, closely supervised burn in a draft-free room. Allow the melted wax to reach as close to the sides as safely possible. For many candles, this is enough to soften the raised wax and encourage the next melt pool to spread wider.
If one side remains high, let the candle cool completely and trim the wick. Then relight it for a proper burn session. Make sure the vessel is level and the flame is not leaning toward a vent or window. Patience matters here. Trying to force a candle to catch up through repeated short burns usually deepens the tunnel.
For a more stubborn wax wall, a candle warmer lamp can be a thoughtful option if it is designed for candles and used according to its instructions. The gentle top-down heat can soften the surface wax without adding another flame. Once the wax has melted more evenly, allow it to cool fully before trimming the wick and returning to regular burning.
Some candle lovers use aluminum foil to trap heat around the top of a tunneling candle. While this can work, it is easy to overheat the vessel, scorch the wick, or create a fire risk if done carelessly. It is not the first choice for a luxury candle meant to make your home feel cared for. If you choose this method, use extreme caution, keep foil away from the flame, monitor the candle constantly, and stop immediately if the jar becomes excessively hot. Never use it with cracked glass, a very low wax level, or an unattended candle.
How to Prevent Uneven Tunneling on Future Burns
The most beautiful candle care is simple and consistent. Burn long enough to establish an even melt pool, but respect the brand's recommended maximum burn time. Trim the wick before every burn. Keep the candle away from drafts, curious pets, children, fabrics, and anything that can catch fire.
It also helps to avoid burning a candle when you only have a few rushed minutes. Save it for the moments when you can let its fragrance settle into the room: while you reset your space after a long day, ease into a bath, prepare for guests, or make an ordinary evening feel more intentional.
A multi-wick candle deserves special attention. Light all wicks at the same time and extinguish all of them together. Lighting only one wick can create an uneven pool and put extra heat on one side of the vessel. If one wick appears weaker than the others, check that every wick is trimmed to a similar length before lighting.
When It Is Time to Stop Burning
Do not burn a container candle down to the last trace of wax. Stop using it when about one-half inch of wax remains at the bottom, or follow the specific safety label on the vessel. As wax runs low, heat reaches the bottom of the container more intensely, which can make the glass dangerously hot.
A candle that tunnels unevenly is not a failure. It is an invitation to slow down and give a small ritual the attention it deserves. With a level surface, a neatly trimmed wick, and enough unhurried burn time, your candle can return to what it was made to offer: a warm glow, a lingering aroma, and a softer feeling in the room around you.